A beginner’s guide to installing and using nnn on Fedora — plus how it compares to ranger and feh.
Ever opened a graphical file manager just to glance at a folder of screenshots, and watched it take three full seconds to load? Terminal users solved this problem years ago. The tool many of them reach for is nnn — a file manager so small it starts in milliseconds, yet powerful enough to preview images, play music, and extract archives without ever touching a mouse.
This guide covers what nnn is, why it beats the alternatives for most people, how to install and use it on Fedora, and where nnn fits next to two other tools you’ll hear about constantly in this space: ranger and feh.
What is nnn?
nnn (short for “n³”, styled in lowercase) is a terminal file manager written in C. It was built as a faster, leaner successor to an older tool called noice, with one guiding philosophy: do file management fast, and do everything else through optional plugins rather than bloating the core program.
Because it’s written in C rather than an interpreted language like Python, nnn’s entire program is a single compiled binary that opens almost instantly — even on modest hardware. In practice, that means:
- Navigating folders with
hjklor arrow keys, no lag - Previewing text, images, PDFs, and media in a split pane
- Bookmarking frequently visited directories for one-key access
- Batch renaming, archiving, and running shell commands on selected files
- Extending functionality through a plugin system, instead of a bloated core
nnn vs. ranger vs. feh: Know What Each Tool Actually Does
These three names get mentioned in the same breath a lot, but they solve different problems. Mixing them up is the most common beginner confusion.
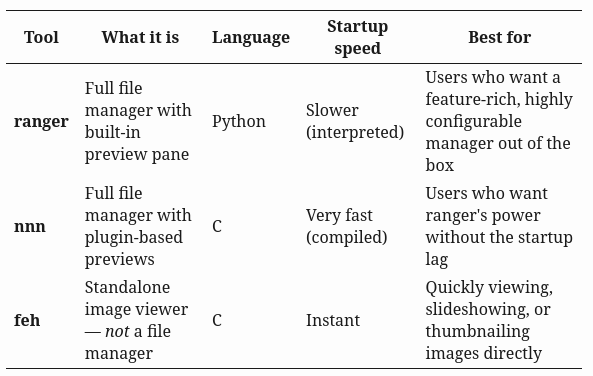
The key distinction: ranger and nnn are file browsers — you use them to move around your filesystem, and image preview is one feature among many. feh is a dedicated image viewer — you point it at an image or folder and it just shows you pictures, nothing else. If your workflow is “browse a messy Downloads folder and peek at whatever’s in it,” you want a file manager like nnn. If your workflow is “open this exact photo, or flip through this folder of photos,” feh is faster and simpler.
A common combo: use nnn as your daily driver for navigating the filesystem, and let it hand off to feh (or an image protocol like chafa/ueberzug) whenever you actually need to preview or view an image.
How to Install nnn on Fedora
Fedora ships nnn in its standard repositories, so installation is a single command:
sudo dnf install -y nnnEnabling Image Previews
Out of the box, nnn shows file names and basic file type icons — it doesn’t render images inline until you turn on the preview plugin. The preview plugin needs a backend to actually draw pixels in your terminal. On Fedora, the easiest backend is chafa (renders images as high-quality terminal art, works in any terminal):
sudo dnf install -y chafaThen enable nnn’s built-in preview-tui plugin:
mkdir -p ~/.config/nnn/plugins
curl -Ls https://raw.githubusercontent.com/jarun/nnn/master/plugins/preview-tui -o ~/.config/nnn/plugins/preview-tui
chmod +x ~/.config/nnn/plugins/preview-tui
Add this to your ~/.bashrc (or ~/.zshrc) so nnn’s preview key works and directory-changing on quit is enabled:
export NNN_PLUG='p:preview-tui'Reload your shell (source ~/.bashrc), then launch nnn and press p on any file to open a live preview pane — images, text, and even PDFs (if pdftoppm is installed) will render right there.
Using nnn: The Basics
Launch it by typing:
nnnHere’s the essential cheat sheet to get moving immediately:
- Move around: arrow keys or
hjkl(left / down / up / right, vim-style) - Open a file/enter a directory:
lorEnter - Go back:
horBackspace - Bookmark current directory:
Shift+b, jump to a bookmark withb - Preview a file (with the plugin set up above):
;thenp— plugins live under the;leader key, separate from single-letter file operations - Select multiple files:
Spaceon each, then act on the selection - Copy / move / delete selected: after selecting files with
Space, pressShift+C/Shift+M/Shift+D - Open a shell in the current directory:
! - Quit:
q
A nice beginner habit: press ? inside nnn at any time — it opens the built-in help screen listing every keybinding, so you never have to memorize this list up front.
Troubleshooting: Getting Image Previews Actually Working
The preview-tui setup above is the “should just work” version. In practice, getting a real image to render inline took four rounds of debugging. If you hit any of these, you’re not doing anything wrong — they’re genuine sharp edges in how the plugin discovers your terminal and image backend. Here’s every error encountered, in the order they showed up, and what actually fixed each one.
“Pressing p opens an empty file in my editor”
Symptom: Pressing p on a highlighted file drops you into nano (or vi) on a blank, unrelated temp file like /tmp/.nnnXXXXXX, with no preview in sight.
Cause: p is not the plugin key. It’s nnn’s built-in binding for “open with $PAGER.” Plugins configured through NNN_PLUG don’t hijack existing letter keys — they live under a separate leader key, ;. So p alone was always going to hit a built-in action, never the preview plugin.
Fix: Use ; then p (press semicolon, release, then press p) to invoke the plugin, not p on its own.
“cp: ‘…/Screenshots’ and ‘./Screenshots’ are the same file”
Symptom: Instead of a preview, nnn shows a red error — cp: same file — followed by 'Enter' to continue, and it kept happening on every subsequent launch.
Cause: Once we corrected course and started pressing p directly (before realizing the ; prefix was required), we ran straight into nnn’s actual binding for that key: p = “Copy here” — paste whatever’s currently selected into the current directory. A folder had gotten selected earlier by accident, and nnn persists selections across sessions in ~/.config/nnn/.selection. So every fresh nnn launch was still trying to copy that folder onto itself.
Fix: Delete the stale selection file (rm ~/.config/nnn/.selection) and — again — use ;p instead of bare p going forward. Worth knowing: if nnn ever seems to be acting on files you didn’t touch this session, check that selection file.
“env: ‘xterm’: No such file or directory”
Symptom: ;p now reaches the plugin, but it immediately fails trying to launch a terminal.
Cause: preview-tui needs somewhere to draw the preview. If you’re not running inside tmux, kitty, or WezTerm, its fallback is to pop open a brand-new xterm window — and plain Fedora installs don’t ship xterm by default.
Fix: Rather than installing a whole separate terminal emulator just for this, run nnn inside tmux instead (check with tmux -V; the plugin needs >=3.0). Inside tmux, previews render as a split pane in the same window — no popup, and generally a better experience than the xterm fallback anyway.
The preview shows “Binary file” info instead of the actual image
Symptom: The split pane opens, but instead of a picture it shows plain text: -------- Binary file -------- followed by file/mediainfo output (JPEG dimensions, etc.) — the metadata about the image, not the image.
Cause: preview-tui‘s image-rendering step only auto-detects a few specific backends: kitty’s graphics protocol, ueberzug, and WezTerm’s image protocol. Plain tmux on an ordinary terminal matches none of those. It will use chafa (or any other image-to-terminal tool) — but only if you tell it to, via the NNN_PREVIEWIMGPROG environment variable. Left unset, it silently falls back to printing file info instead of erroring out.
Fix: export NNN_PREVIEWIMGPROG=chafa in ~/.bashrc. That one variable is what actually connects the plugin to the image renderer you installed earlier.
The screen fills with “+” characters and the words “SIXEL IMAGE”
Symptom: Setting NNN_PREVIEWIMGPROG=chafa gets further, but instead of a picture, both panes — the preview and the file list next to it — fill with rows of + characters, with SIXEL IMAGE (50x14) printed at the top.
Cause: chafa auto-detects your terminal’s capabilities and picks the best available output format on its own. Here, it guessed (incorrectly) that the terminal supports the Sixel graphics protocol and switched to emitting raw Sixel escape codes. Since this was running inside tmux without Sixel passthrough configured, those escape codes weren’t interpreted as graphics — they just printed as garbage, and corrupted the terminal’s rendering state badly enough to smear into the unrelated file-list pane too.
Fix: Force chafa to skip protocol auto-detection and always use plain Unicode block-character output: export NNN_PREVIEWIMGPROG='chafa -f symbols'. This trades a bit of image fidelity for guaranteed compatibility — worth it, since the alternative is a corrupted screen.
The full env setup, all together
For reference, here’s everything the working config needed, in one place:
# ~/.bashrc
export NNN_PLUG='p:preview-tui'
alias nnn='nnn -a'                         # enables the FIFO the plugin requires
export NNN_PREVIEWIMGPROG='chafa -f symbols'  # renders images as block art, skips protocol auto-detection
Plus, at runtime: launch nnn from inside a tmux session, and trigger the preview with ;p, not p.
None of this is documented as a single “getting started” path in the plugin’s own usage notes — it’s assembled from five separate failure modes. If you’re setting this up yourself, doing it inside tmux from the start and setting NNN_PREVIEWIMGPROG='chafa -f symbols' up front will save you the detour.
A note on preview quality
Once it’s working, don’t expect a crisp photo in that pane — chafa -f symbols approximates the image using colored Unicode block characters, not real pixels. It’s a text-based mosaic: readable enough to confirm “yes, that’s the sunset photo I’m looking for,” but blocky and low-resolution compared to the source file. That’s the tradeoff for working reliably inside a plain terminal over tmux without a graphics protocol.
To actually view the file at full quality, press Enter (or l) on it as usual — that opens it in your real default image viewer, completely separate from the preview pane. The preview is a peek, not a viewer.
If you want sharper previews and are willing to trade some setup complexity: running nnn inside the kitty terminal emulator lets preview-tui use kitty’s own graphics protocol automatically, which renders actual pixels instead of block art — no chafa involved at all.
Further Curiosities: Replacing chafa with kitty for better preview quality?
The block-art previews work, but the natural next question is: how much sharper is a realhttps://nostradmsx.com/nnn-the-fastest-way-to-browse-files-and-preview-images-from-your-terminal/ graphics protocol? Here’s what it took to switch, and what it actually cost.
Installing and wiring up kitty
Fedora ships kitty in the standard repos:
sudo dnf install -y kittyTwo config files make the plugin actually use it. First, kitty itself needs remote control turned on — this is how external programs (like the preview plugin) can tell kitty “draw this image in that pane”:
# ~/.config/kitty/kitty.conf
allow_remote_control yes
listen_on unix:/tmp/kitty
enabled_layouts splits
Second, since previews were already running inside tmux (from the earlier fix), tmux needs to let kitty’s graphics escape codes pass through its own pane instead of swallowing them:
# ~/.tmux.conf
set -g allow-passthrough on
With both in place, the workflow barely changes: open the kitty app, start tmux inside it, run nnn, and press ;p on an image as before. Nothing about NNN_PLUG or the nnn side needed to change — preview-tui detects the KITTY_LISTEN_ON environment variable that kitty sets automatically and switches itself over to kitty’s icat image protocol, bypassing chafa entirely.
The trade-off
| chafa (symbols) | kitty graphics protocol | |
|---|---|---|
| Image quality | Blocky Unicode-character approximation | Real pixels — genuinely sharp |
| Terminal requirement | Any terminal at all | Must actually run the kitty app specifically |
| Setup | One environment variable | Terminal config + tmux passthrough config |
| Works over SSH | Yes, trivially — it’s just text | Only if the remote session’s terminal is kitty-aware; more fragile over a plain SSH pipe |
| Works in any tmux/screen session | Yes | Only with passthrough explicitly enabled |
| Resource use | Negligible — a small CLI call | kitty itself is GPU-accelerated; heavier than a minimal terminal |
The honest answer to “which is better”: kitty wins on quality, chafa wins on going anywhere without a fuss.
When chafa is still the better call
- You’re not always at this machine. If you SSH into servers, VMs, or someone else’s box regularly, chafa previews work unmodified over that connection. Kitty’s protocol depends on the terminal you’re physically sitting in front of, not the remote shell — so it can’t help you when you’re several SSH hops away.
- You don’t want to adopt a new terminal app. Switching to kitty as your daily driver is a bigger commitment than it looks — different config format, different keybindings for tabs/splits, different everything from GNOME Terminal or whatever you’re used to. Chafa asks nothing of your terminal choice.
- You’re scripting or automating previews (e.g. generating thumbnails for a script’s output) where a real terminal graphics session may not even exist. Chafa degrades gracefully to plain text in a way a graphics protocol cannot.
- Low-power or minimal environments — a Raspberry Pi, a stripped-down VM, a rescue shell — where running a GPU-accelerated terminal is overkill for glancing at a file.
If your daily workflow is “one machine, sitting in front of it, want the best preview quality” — kitty is the clear upgrade. If your workflow is “moving between machines, SSHing around, want it to just work everywhere” — chafa’s blockiness is a fair price for that portability, and it’s worth keeping NNN_PREVIEWIMGPROG='chafa -f symbols' as the fallback even after setting up kitty, since it’s what nnn falls back to automatically whenever kitty’s specific detection conditions aren’t met.
Full Disclosure: Two kitty Failures Encountered While Writing This Guide
In the interest of not just showing the polished result: kitty failed twice during this setup, in two genuinely different ways. Both are documented here, anonymized (no hostname, username, PID, or system UUID — none of that is needed to describe either bug).
Failure 1: SIGSEGV on close
kitty crashed with a SIGSEGV after being closed, twice in the same session. Fedora’s crash reporter (ABRT) caught it automatically.
- What crashed: kitty 0.43.1 (Fedora package
kitty-0.43.1-3.fc43) - How: killed by
SIGSEGV(a memory-safety violation, not a graceful error) - Where: the crash function reported was
destroy_queued_closure - When: on closing the kitty window, not during normal use
- How often: twice within the same session
- Context: this was actively using kitty’s remote-control socket (
allow_remote_control,listen_on) together with tmux’sallow-passthrough, driven by the nnn preview plugin — a less common combination than “just open kitty and type in it” - Immediately preceding the crash, the session log showed repeated warnings:
[PARSE ERROR] Ignoring OSC 3008, used by systemd for ...andApplication escape mode is not supported, the extended ...— these are warnings, not confirmed as the cause, but they’re worth including since they’re the last thing logged before the crash
Failure 2: kitty stopped launching at all
Separately, kitty later stopped starting entirely — clicking/launching it did nothing. The system journal showed the real cause:
[glfw error 65544]: EGL: Failed to make context current: EGL failed to allocate resources for the requested operationfollowed by systemd-coredump recording a core dump. This is a GPU graphics-context allocation failure, not a nnn or tmux issue — and it points squarely at the machine’s GPU setup: an NVIDIA GPU running the proprietary driver, with kitty defaulting to native Wayland/EGL rendering. NVIDIA’s Wayland/EGL path has a known history of exactly this kind of intermittent context-allocation failure with GPU-accelerated applications; a retry a minute later actually succeeded, confirming it was intermittent rather than a permanent break.
The fix: force kitty onto X11 (via XWayland) instead of native Wayland, which uses NVIDIA’s far more mature GLX path:
# ~/.config/kitty/kitty.conf
linux_display_server x11
After adding that line, kitty launched cleanly and repeatedly with no further EGL errors. This is a direct, concrete example of the “heavier footprint, occasional GPU-driver quirks” trade-off flagged earlier in this article — not a hypothetical, but something that actually happened while writing it.
Should either of these be reported, or ignored?
Reported, not ignored — for both, though for slightly different reasons:
- Both are genuine crashes (memory-safety violation, and a GPU context failure with a core dump), not cosmetic glitches — worth surfacing even when things appear to keep working afterward.
- The SIGSEGV reproduced twice, and the EGL failure reproduced across separate launches — neither is a one-off fluke.
destroy_queued_closureand the EGL/Wayland context failure are both specific, actionable leads — far more useful to maintainers than “kitty crashed sometimes.”- The SIGSEGV surfaced in a less-mainstream workflow (remote control plus tmux passthrough); the EGL failure surfaced on a common but specific configuration (NVIDIA proprietary driver + Wayland). Both are exactly the kind of edge case that benefits from a report, even if either turns out to already be known upstream.
Fedora’s crash dialog offers a one-click “Report” option when it appears; if it wasn’t sent at the time, either can still be filed manually at github.com/kovidgoyal/kitty/issues — referencing destroy_queued_closure and the SIGSEGV-on-close for the first, or the EGL context-allocation error plus “NVIDIA proprietary driver on Wayland” for the second. Each is a five-minute report with a real chance of helping fix a real bug — worth doing, not worth shrugging off.
Meet kitty: Is It Worth Adopting as Your Everyday Terminal?
So far, kitty has only been used as a means to an end — a backend that makes one plugin render sharper images. But kitty is a full terminal emulator in its own right, and on Fedora it’s competing directly with GNOME’s own terminal — the default that would otherwise be sitting on this desktop. Since it’s now on the machine anyway, it’s worth asking whether it deserves to be the terminal you actually live in, not just the one nnn borrows for previews.
(One correction in the interest of accuracy: this comparison talks about “GNOME Terminal” throughout, since that’s the long-standing, widely-documented default. But a quick check of this actual machine turned up something worth knowing — see the dedicated section below on what’s really installed here, and what it can do.)
What makes it different
kitty is GPU-accelerated — it renders text using OpenGL instead of the CPU-bound rendering GNOME Terminal (built on the VTE library) uses. In practice that means noticeably faster redraws when a command dumps a huge amount of output (think cat on a large log file, or a noisy build process scrolling past). It also natively supports things GNOME Terminal doesn’t: real inline image display (the icat protocol used earlier in this article), font ligatures for programming fonts, and a genuine split/tab layout system built into the terminal itself, no tmux required for basic pane arrangements.
Pros
- Speed. GPU rendering makes a real, perceptible difference with heavy scrollback or fast-moving output.
- Built-in image and graphics support. The protocol this whole preview setup relies on. GNOME Terminal has no equivalent.
- Native splits and tabs. Layouts (
splits,stack,grid, and others) without needing a separate multiplexer, though it plays nicely with tmux too, as shown above. - Kittens. Small built-in extensions for specific jobs:
icat(images),diff(side-by-side file diffing),hints(select and act on URLs/paths/hashes straight from terminal output),ssh(a drop-insshreplacement that keeps kitty’s shell integration working on the remote end), and more. - Remote control API. Other programs can script the terminal itself — open a split, run a command in it, change a setting — over the same socket the preview plugin used. This is a real scripting surface, not just a passive display.
- Ligature and font rendering quality. A common reason developers switch, independent of anything covered in this article.
Cons
- Config is a plain text file, not a settings dialog.
~/.config/kitty/kitty.confhas no GUI equivalent — every change is a line of text and (for most options) a reload. That’s a feature for tinkerers and friction for someone who wants to right-click and pick a color. - Heavier footprint. GPU rendering means a GPU process is now part of your terminal. On machines with flaky graphics drivers, inside some VMs, or over certain remote-desktop setups, that’s a real source of quirks that a plain CPU-rendered terminal never has to deal with.
- Looser desktop integration. GNOME Terminal inherits your system accent color, appears correctly in GNOME’s “Open Terminal Here” file-manager actions by default, and behaves exactly as a GNOME user expects. kitty works fine on GNOME but feels like a guest, not a resident — expect to manually wire up a few things (default terminal app, file-manager integration) if you switch fully.
- Steeper learning curve. Splits, layouts, kittens, and remote control are powerful, but they’re also more surface area to learn than “open a tab, type commands.”
New Machine, Same Bugs (Mostly): Setting This Up on a Second Box
Everything above was worked out on one machine. Repeating the exact same install on a second Fedora box (reached over SSH from the first) surfaced three more errors — variants of bugs already covered, not new ones, but worth documenting because the cause was different enough to be confusing in the moment.
“No FIFO available! ($NNN_FIFO=”)”
Symptom: Pressing ;p doesn’t open a preview pane at all — it immediately errors with No FIFO available! ($NNN_FIFO='') and points at the plugin’s own usage notes.
Cause: Two separate gaps stacked on top of each other. First, only the NNN_PLUG line had actually made it into ~/.bashrc on this machine — the alias nnn='nnn -a' line, which is the one that actually enables the FIFO the plugin needs, was missing entirely. Second, the shell in use turned out to be zsh, not bash — so even if the alias had been there, it would never have loaded, since zsh reads ~/.zshrc on startup, not ~/.bashrc. type nnn confirmed it: no “aliased to” in the output, just the raw binary path.
Fix: Check which shell you’re actually running before assuming ~/.bashrc is the right file: echo $SHELL. Add all three lines from “The full env setup” above to whichever rc file that shell reads (~/.zshrc for zsh, ~/.bashrc for bash), then source it or open a new terminal.
“env: ‘xterm’: No such file or directory” — again
Same error, same cause, same fix as the first time: preview-tui falls back to xterm when it can’t detect tmux, kitty, or WezTerm, and this machine didn’t have xterm installed either. Running nnn inside tmux fixed it exactly as before — and notably, this held up over an SSH session too. No extra SSH-specific config was needed for the tmux split-pane preview to work; tmux → nnn → ;p behaved identically to the local setup.
“GLFW initialization failed”: trying to launch kitty itself over SSH
Symptom: After installing kitty on the remote box hoping for sharper previews, running kitty inside the SSH session fails immediately:
[glfw error 65544]: X11: The DISPLAY environment variable is missing
GLFW initialization failed
Cause: A misunderstanding of what kitty over SSH actually means. kitty is a GUI application — running it opens a new window on whatever display it’s launched from. Typing kitty inside an SSH session tries to open that window on the remote machine, which has no display server reachable over a plain SSH connection, hence the missing DISPLAY. But a second kitty window on the remote side was never the goal — the local kitty window (already open on the machine you SSH’d from) is the only one that needs to exist. What actually needs to happen is getting the remote shell to speak kitty’s graphics protocol, so escape codes travel back over the SSH connection and get drawn by the kitty window you’re already sitting in.
Fix: Reconnect using kitty’s own SSH kitten instead of plain ssh:
kitten ssh user@remote-hostThis automatically sets TERM=xterm-kitty and installs kitty’s terminfo on the remote side for that session — no manual terminfo copying, and no second kitty process needed on the remote machine. From inside a kitten ssh session, tmux → nnn → ;p with NNN_PREVIEWIMGPROG=chafa (no -f symbols needed) renders real pixels instead of block art, the same as running locally in kitty.
Confirmed working: the natural next instinct is to type kitty again once connected via kitten ssh, just like you would locally — don’t. kitten ssh already put the whole session into kitty-protocol mode; go straight to tmux → nnn from the prompt it drops you into. Adding a kitty call on top just reproduces the original GLFW initialization failed error.
“How do I know if I’m actually looking at chafa or kitty?”
Even with kitten ssh connected correctly, it wasn’t obvious at first whether previews were using kitty’s real graphics protocol or had quietly fallen back to chafa’s block art — especially since tmux always rewrites $TERM to tmux-256color once you’re inside a session, regardless of what the outer terminal actually is. That made $TERM useless for this check the moment tmux started.
What was actually missing: ~/.tmux.conf didn’t exist on this machine at all — meaning allow-passthrough was off by default, and tmux was silently swallowing kitty’s graphics escape codes even after everything else (kitty installed, connected via kitten ssh, NNN_PREVIEWIMGPROG pointed at plain chafa) was correctly in place.
The fix, all three pieces together:
# ~/.tmux.conf
set -g allow-passthrough on
kitten ssh user@remote-host # not plain ssh
export NNN_PREVIEWIMGPROG=chafa # override the -f symbols default for this session
tmux
nnnWith all three in place — passthrough enabled, connected via the kitty SSH kitten, and the forced symbols flag overridden — ;p produced a genuinely sharp, full-color preview with clean edges, not a block mosaic.
How to tell which one you’re looking at, reliably:
- Visually: chafa’s
-f symbolsoutput is visibly a grid of colored Unicode block characters — readable but blocky. kitty’s protocol renders the real bitmap: smooth gradients, anti-aliased edges, indistinguishable from opening the file directly. echo $KITTY_WINDOW_ID— non-empty only inside a genuine kitty-protocol chain. Unlike$TERM, tmux doesn’t overwrite this, so it stays reliable even once tmux is running.echo $TERM— useful before starting tmux (should readxterm-kitty), but not after, since tmux always rewrites it totmux-256colororscreen-256color.echo $NNN_PREVIEWIMGPROG— if this ischafa -f symbols, the preview will be block art no matter what terminal or protocol is actually available, since that flag forces the output format and skips auto-detection entirely.
Preview vs. actually opening the file over SSH
With everything above working, the next natural question was: can I open the file for real, full-size, the normal way — pressing Enter/l on it in nnn — or am I stuck with just the fixed-size preview pane?
The answer: over kitten ssh into a headless remote box, just the preview. nnn’s default “open” action for a file hands it off to a GUI viewer via xdg-open (typically something like eog or feh), and that’s a real graphical application expecting a display server. There’s no DISPLAY available over this SSH session — the same reason plain kitty failed with GLFW initialization failed earlier — so the normal open action fails or hangs. The preview pane works because kitty’s graphics protocol draws directly into terminal cells and tunnels back through the SSH connection to the local kitty window; it never needs a GUI window at all.
To view a file at full size anyway, skip nnn’s opener and call kitty’s own image kitten directly, without leaving tmux or reconnecting:
Split the tmux pane instead of quitting nnn (Ctrl+b then % for a vertical split), and in the new pane run:
kitty +kitten icat filename.pngThis uses the exact same protocol as the preview pane, so it needs no DISPLAY either — it renders the real image, full-size, right in the terminal. Press any key to dismiss it, then switch back to the nnn pane with Ctrl+b and an arrow key. Neither the tmux session nor the kitten ssh connection need to be restarted for this — both were already correctly set up; icat just needed a plain shell prompt to run from.
TL;DR: fixing a fresh machine
- Check your actual shell first —
echo $SHELL. Don’t assume~/.bashrcis being read. - Add all three lines to that shell’s rc file:
NNN_PLUG,alias nnn='nnn -a',NNN_PREVIEWIMGPROG='chafa -f symbols'. sourcethe rc file (or open a new terminal) so the alias actually takes effect.- If you hit the
xtermerror, run nnn from inside tmux (tmux -Vto confirm it’s installed, thentmux→nnn) — this works the same whether you’re local or connected over SSH. - Want kitty’s sharper previews over SSH? Don’t run
kittyitself on the remote box — connect withkitten ssh user@hostinstead of plainssh, then use tmux/nnn as usual inside that session. - That sharper preview also needs
set -g allow-passthrough onin~/.tmux.confon the remote box (create the file if it doesn’t exist) andexport NNN_PREVIEWIMGPROG=chafafor that session — without both, you’ll still get block art even overkitten ssh. Check withecho $KITTY_WINDOW_ID(should be non-empty) rather than$TERM, since tmux overwrites$TERMonce it’s running.
Further Reading & References
VTE library — the shared rendering engine behind both GNOME Terminal and Ptyxis
nnn GitHub repository — source, releases, and the full plugin catalog
nnn wiki — in-depth guides on plugins, configuration, and advanced usage
nnn plugins directory — browse all official plugins, including preview-tui
ranger official documentation — for comparison, or if you decide you want ranger’s deeper configurability instead
feh homepage — full manual for the standalone image viewer
kitty terminal documentation — remote control, the graphics protocol, and icat
kitty kittens overview — the built-in extensions mentioned above (ssh, diff, hints, and others)
kitty remote control documentation — the scripting API that lets external tools drive the terminal, as used by nnn’s preview plugin
kitty graphics protocol specification — for readers curious how real pixel rendering in a terminal actually works under the hood
chafa GitHub repository — the terminal image-rendering library used for previews
Ptyxis GitLab repository — source for GNOME’s newer terminal, including its container-integration features
GNOME Terminal documentation — classic GNOME Terminal’s official user guide